
How To Hang Your Framed Mirror
Hanging with french cleats
DO NOT LIFT THE MIRROR BY THE TOP PART OF THE FRAME
TOOLS REQUIRED
Tape measure, laser or spirit level, pencil, roll of tape, drill, fixings to suit your substrate.
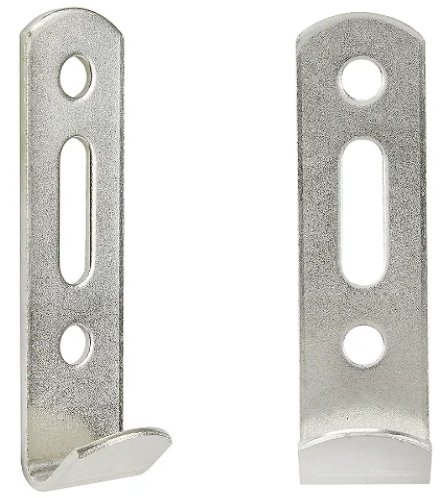
Your Made2measure mirror usually comes with 2 lengths of aluminium cleat already attached to the back.
FIXING METHOD
As with any wall drilling, please check for electrical cables and pipes. We recommend that the electricity supply is switched off whilst carrying out this work.
We do not supply wall fixings, as the quantity, size and type will depend on your individual substrate requirements.
Drill fixing holes in the cleat rails (we recommend a maximum of 120mm between fixing points).
Carefully measure the distance between the top and bottom wall fixing rails. (this is best done with the brackets in a temporary fixed position on the back of the mirror). Transfer this measurement to the wall and using a level, tape the cleats in position. Mark through the fixing holes onto the wall and carefully drill and insert the correct fixings.
Attach the cleats to the wall in the prepared position, checking again with the level and ensure that both cleats are parallel.
We suggest using 2 people to lift and fit the mirror to the wall.
Carefullly position the mirror above the fixing rails and gently slide down. Check that both the top and bottom fixing rails have engaged and are supporting the mirror.
Stand back and admire your new Made2measure mirror.

hanging with a wire system
DO NOT LIFT THE MIRROR BY THE TOP PART OF THE FRAME
TOOLS REQUIRED
Tape measure, laser or spirit level, pliers, pencil, drill, fixings to suit your substrate.
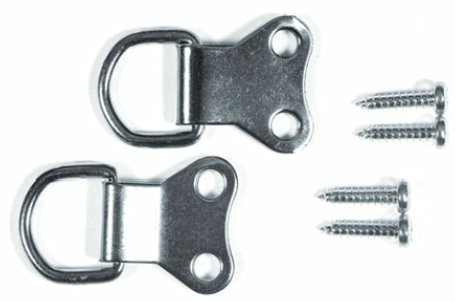
Your Made2measure mirror comes with 2 D rings and wire to be attached to the rear of the mirror, and 2 brackets that fix to the wall surface. Depending on the size and weight of your mirror, we will supply either wire with aluminium ferrules or wire that can be secured by forming a knot and twisting.
FIXING METHOD
As with any wall drilling, please check for electrical cables and pipes. We recommend that the electricity supply is switched off whilst carrying out this work.
We do not supply wall fixings, as the quantity, size and type will depend on your individual substrate requirements.
Begin by fixing the 2 D rings to the rear of the frame. These should be positioned approximately a quarter of the way down from the top edge. For example if the height of your mirror is 1000mm, then you should place the D ring 250mm from the top edge, ensuring they are level.
Never hang the mirror or frame using the top edge.
Next secure the wire between the D rings
If your mirror came with wire and ferrules, place a ferrule onto the wire, loop the wire through the D ring and back through the ferrule. Crimp the aluminium ferrule firmly with the pliers to lock the wire in position. See image below
Repeat this procedure with the other D ring leaving some slack in the wire.
If the wire has been supplied without ferrules, loop around each D ring and tie / twist until secure as per diagram below. Make sure that there is some slack in the wire when fastened.
With the wire fixed in position, apply tension at either end of the wire approximately 200mm in from each side of the mirror. Measure down from the top of the frame to this position. You can now use this measurement to mark where the fixing brackets need to be on the wall.
Secure the 2 fixing brackets supplied (one fixing is not recommended) to the wall approximately 200mm in from the outer edge of the frame, making sure they are level (size and type of fixings will depend on your wall structure). For mirrors smaller than 1m in width, reduce this distance to suit the mirror size.
With 2 people, supporting the frame (DO NOT HOLD THE TOP PART OF THE FRAME) carefully place the rear wire over the 2 fixing brackets (supplied). Gently lower the mirror until it is fully supported by the fixings.
Check that the mirror is secure and using the level, adjust as necessary by carefully sliding it slightly left or right.
Stand back and admire your new Made2measure mirror.


how to hang with d rings
DO NOT LIFT THE MIRROR BY THE TOP PART OF THE FRAME
TOOLS REQUIRED
Tape measure, laser or spirit level, pencil, roll of tape, drill, fixings to suit your substrate.
Your Made2measure mirror comes with D rings and wall brackets.
We do not supply wall cavity fixings, as the quantity, size and type will depend on your individual substrate requirements.
FIXING METHOD
As with any wall drilling, please check for electrical cables and pipes. We recommend that the electricity supply is switched off whilst carrying out this work.
Begin by fixing the 2 D rings to the rear of the frame. These should be positioned approximately a quarter of the way down from the top edge. For example if the height of your mirror is 1000mm, then you should place the D ring 250mm from the top edge, ensuring they are level.
Never hang the mirror or frame using the top edge.
Measure the distance between the D ring centres and transfer this measurement to your wall. Check with a level and mark the surface. Position the wall brackets at your desired location and fix securely to the wall.
With 2 people, supporting the frame (DO NOT HOLD THE TOP PART OF THE FRAME) carefully place the D rings over the 2 fixing brackets (supplied). Gently lower the mirror until it is fully supported by the fixings.
Stand back and admire your new Made2measure mirror.
Mablethorpe, Lincolnshire, LN12 1LE


