How To Install 3D Channel Letters
Non illuminated letters
NON ILLUMINATED
All our built up 3D letter kits are supplied with
LED lights, Drivers, Cables, Conduit, Fixings, Paper template
Some basic tools you will need
Tape measure
Drill bit 6, 8 or 10mm depending on fixings
Spirit level
Masking tape (50mm is recommended)
Screwdriver
Cleaning solution (non abrasive)
- Clean the mounting surface. If on brickwork, use a stiff brush to
remove any surface dust. - Tape the paper template to the wall / surface in the desired position.
NOTE: When positioning on brickwork, where possible try and avoid
drilling near the brick edges. - Adjust as necessary, and check with a spirit level using the printed horizontal guide on the template.
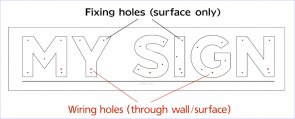
- Carefully drill 6mm fixing holes through the template (marked in black) in the centre of the marked fixing points. Please note for letters more than 300mm high, larger fixings will be supplied.
- Make sure all holes have been drilled before removing the template. Clean any dust from the surface. Place a plug in each fixing hole and offer up the correct letter (duplicated letters are marked on the back) checking that all holes line up, fix the letter with the screws provided, taking care not to over-tighten.
- The letter faces can now be attached to the letter body using the fixings supplied.
- Finally, clean the letters with a non-abrasive cleaner to remove finger prints, dust etc., stand back and admire your new sign.
INSTALLATION TIPS
If installing outdoors, check the weather:
Installation is a job for a fine day, wind and rain are the sign installers enemy. Rain will destroy the paper template, and it will wrap around you in windy conditions.
Make sure the fixing surface is dry as it will be impossible to tape it to a wet surface.
Get some help: It is so much easier if you have an extra pair of hands, especially with positioning the template.
If drilling through brickwork, start and finish with the hammer action turned off.
If drilling through an exterior wall for the electric cable, slightly angle the drill upwards to avoid any condensation running into the cavity.
LED Illuminated letters
LED ILLUMINATED LETTERS
All our built up 3D letter kits are supplied with
LED lights, Drivers, Cables, Conduit, Fixings, Paper template
Some basic tools you will need
Tape measure
Drill bit 6, 8 or 10mm depending on fixings
Long drill bit, approximately 15mm to drill completely through wall
Spirit level
Masking tape (50mm is recommended)
Screwdriver
Cleaning solution (non abrasive)
- Clean the mounting surface. If on brickwork, use a stiff brush to
remove any surface dust. - Tape the paper template to the wall / surface in the desired position.
NOTE: When positioning on brickwork, where possible try and avoid
drilling near the brick edges. - Adjust as necessary, and check with a spirit level using the printed horizontal guide on the template.
- Carefully drill 6mm fixing holes through the template (marked in black) in the centre of the marked fixing points. Please note for letters more than 300mm high, larger fixings will be supplied.
- Next, drill the 15mm holes (marked in red on the template) completely through the substrate to accommodate the LED wiring. (conduit should be placed in each hole to protect the wiring passing through the wall / substrate).
- Make sure all holes have been drilled before removing the template. Clean any dust from the surface. Place a plug in each fixing hole and offer up the correct letter (duplicated letters are marked on the back) checking that all holes line up, fix the letter with the screws provided, taking care not to over-tighten.
- Feed the cable fully through the conduit. Repeat till every letter is fixed and all wires are through the substrate. Apply silicone sealer / mastic around the conduit to avoid water ingress. The wiring is now ready for connection by a qualified electrician.
- Once the wiring has been connected and tested, the letter faces can now be attached to the letter body using the fixings supplied.
- Finally, clean the letters with a non-abrasive cleaner to remove finger prints, dust etc., stand back and admire your new sign.


