
How To Install Tray Signs
Installing your tray sign non-illuminated
SOME BASIC TOOLS YOU WILL NEED
Tape measure
Drill with 6mm bit
Spirit level
Screwdriver
Cleaning solution (non abrasive)
Personal protective equipment
Please note the type of fixings will depend on the
mounting surface
- Clean the wall or fixing location. If on brickwork, use a stiff brush to remove any surface dust.
- Measure the dimensions of the tray and decide your sign location. Mark the centre point on the wall / surface, and on the fixing strip. Working on the top section first, drill the strip in the centre and fix in position. Adjust till horizontal using the level. Now mark and drill the remaining holes, and secure the strip fully.
- Important: Carefully measure the inside dimension of the tray sign from top to bottom. Deduct 1mm from this figure. (this allows for any slight twisting of the strips due to an uneven surface). This determines the overall measurement of the two horizontal fixing strips.
- Using this measurement, fit the lower horizontal fixing strip and check every 50cm that the distance between the top and bottom strips remains the same.
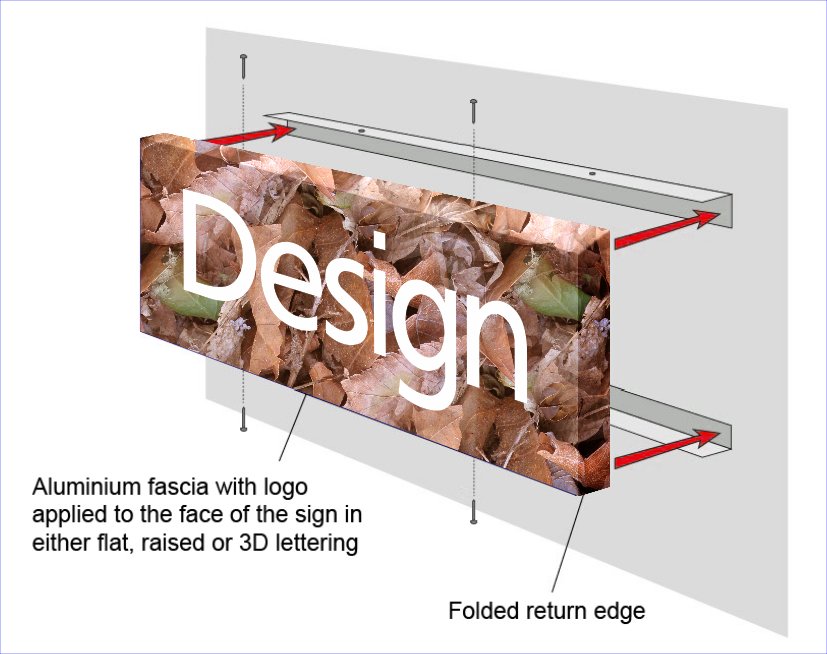
- Carefully lift the tray over the strips. Gentle even pressure may be needed to push it flush to the wall / surface. The capping screws can now be fitted to secure the the sign to the frame.
INSTALLATION TIPS
If installing outdoors, check the weather:
Installation is a job for a fine day, wind and rain are the sign installers enemy. Rain will destroy the paper template, and it will wrap around you in windy conditions.
Make sure the fixing surface is dry as it will be impossible to tape it to a wet surface.
Get some help: It is so much easier if you have an extra pair of hands, especially with positioning the template.
If drilling through brickwork, start and finish with the hammer action turned off.
If drilling through an exterior wall for the electric cable, slightly angle the drill upwards to avoid any condensation running into the cavity.
Installing your tray sign with LED lighting
SOME BASIC TOOLS YOU WILL NEED
Tape measure
Drill with 6mm bit
Spirit level
Screwdriver
Cleaning solution (non abrasive)
Personal protective equipment
Please note the type of fixings will depend on the
mounting surface
This installation differs to the non-illuminated option, in that the sign is made up of two parts. The inner tray is mounted to the wall / surface first. This contains the LED lights, drivers and wiring. It also has a reinforced strip top and bottom to allow the outer tray sign to be secured to it.
- Clean the mounting surface. If on brickwork, use a stiff brush to remove any surface dust.
- Measure the backing tray (that contains the lights) and place it on the wall/surface in the desired position. Drill the top strengthening strip in the centre and mark through to the wall. Adjust till horizontal using the level. Now mark and drill the remaining holes, in both the top and bottom strips.
- Choose where you want the electrical supply to connect to the sign and drill a 15mm hole through the wall or substrate.
- Push the protective conduit through the substrate and feed the connection cable through the conduit, leaving enough wire to connect to the LED driver within the sign.
- Offer up the front section and connect the power cable to the LED driver. Push any excess cable through the conduit.
- Carefully lift the tray over the strips. Gentle even pressure may be needed to push it flush to the wall / surface. The capping screws can now be fitted to secure the the sign to the frame.
- The electrical connection can now be made inside the building or substrate by a qualified contractor.
- Finally, clean the letters with a non-abrasive cleaner to remove finger prints, dust etc., stand back and admire your new sign.
INSTALLATION TIPS
If installing outdoors, check the weather:
Installation is a job for a fine day, wind and rain are the sign installers enemy. Rain will destroy the paper template, and it will wrap around you in windy conditions.
Make sure the fixing surface is dry as it will be impossible to tape it to a wet surface.
Get some help: It is so much easier if you have an extra pair of hands, especially with positioning the template.
If drilling through brickwork, start and finish with the hammer action turned off.
If drilling through an exterior wall for the electric cable, slightly angle the drill upwards to avoid any condensation running into the cavity.

Mablethorpe, Lincolnshire, LN12 1LE


