
How To Measure Your Wall For A Splashback And What To Consider
How to measure for your splashback
MEASURING YOUR WALL AREA FOR SPLASHBACKS
Important information
It is critical that your wall area is measured correctly as we will use the dimensions you provide to manufacture your order.
If your experience of measuring areas is limited or there are complicated cut-outs or notches in your project, we recommend using a professional tradesperson such as a joiner or builder to assist in taking accurate measurements.
The following guidance is designed to assist those with some measuring experience. We recommend 2 people for this job.
Tools needed:
Laser or spirit level, tape measure, pen and paper
Step 1
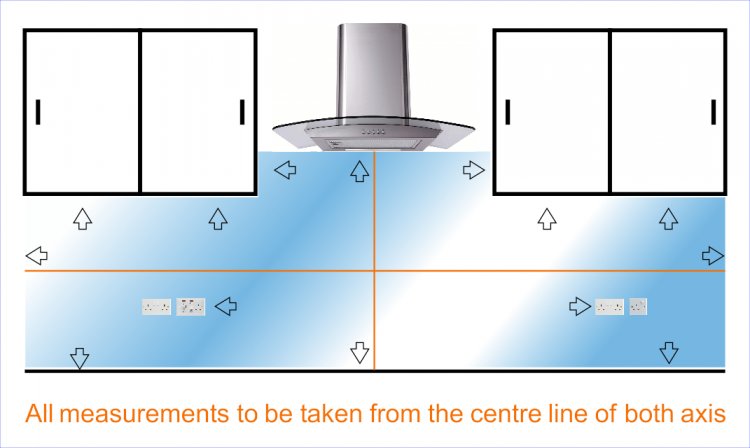
Using the laser or spirit level, accurately mark both horizontal and vertical lines approximately in the centre of the work area. It is not important that they are perfectly in the centre as all measurements will be taken from the centre line of both axis.
As kitchen units and worktops are rarely perfectly level and parallel, take measurements (up and down) at multiple points along the horizontal plane. When measuring to each end, take measurements at both the top and bottom. This is critical as the vertical line may not be exactly 90° from horizontal plane.
We advise that you allow a 3mm gap between the edges of the splashback to allow for manufacturing tolerances and any cut-out sections (our CNC machine will leave a 6mm radius on all 90° internal cuts)
Step 2
When measuring for cut-outs like electrical sockets or switches, all measurements should again be taken from the 2 central horizontal and vertical lines. For the most aesthetically pleasing results, the cut-outs need to be the same size as the electrical backboxes set into the wall. This will allow the cover plate to completely overlap the hole resulting in a smart professional finish. Therefore the measurements must be taken with this in mind.
Mablethorpe, Lincolnshire, LN12 1LE


